> ## Documentation Index
> Fetch the complete documentation index at: https://docs.trackfunnels.com/llms.txt
> Use this file to discover all available pages before exploring further.
# Integrate Calendly with TrackFunnels for UTM Attribution
> Connect Calendly to TrackFunnels to see which UTM campaigns drive appointment bookings, all in a dedicated Calendly Attribution Dashboard.
Connecting Calendly to TrackFunnels gives you full visibility into which UTM parameters are driving appointment bookings. Every new booking is sent to TrackFunnels and attributed to the UTM that brought the visitor to your scheduling page — surfaced in a dedicated **Calendly Attribution Dashboard** inside your account.
 This integration requires both a **TrackFunnels Pro** account and a **paid Calendly account**. Calendly restricts API and webhook access to paid plan users only. [Upgrade or create a free TrackFunnels account](https://trackfunnels.com/utm-links-builder) to get started.
## Connect Calendly
In your TrackFunnels account, go to **Account Settings > Integrations** and click **Integrate** next to Calendly. You'll land on the Calendly Integration screen, where you'll complete just two button clicks to establish the connection.
This integration requires both a **TrackFunnels Pro** account and a **paid Calendly account**. Calendly restricts API and webhook access to paid plan users only. [Upgrade or create a free TrackFunnels account](https://trackfunnels.com/utm-links-builder) to get started.
## Connect Calendly
In your TrackFunnels account, go to **Account Settings > Integrations** and click **Integrate** next to Calendly. You'll land on the Calendly Integration screen, where you'll complete just two button clicks to establish the connection.
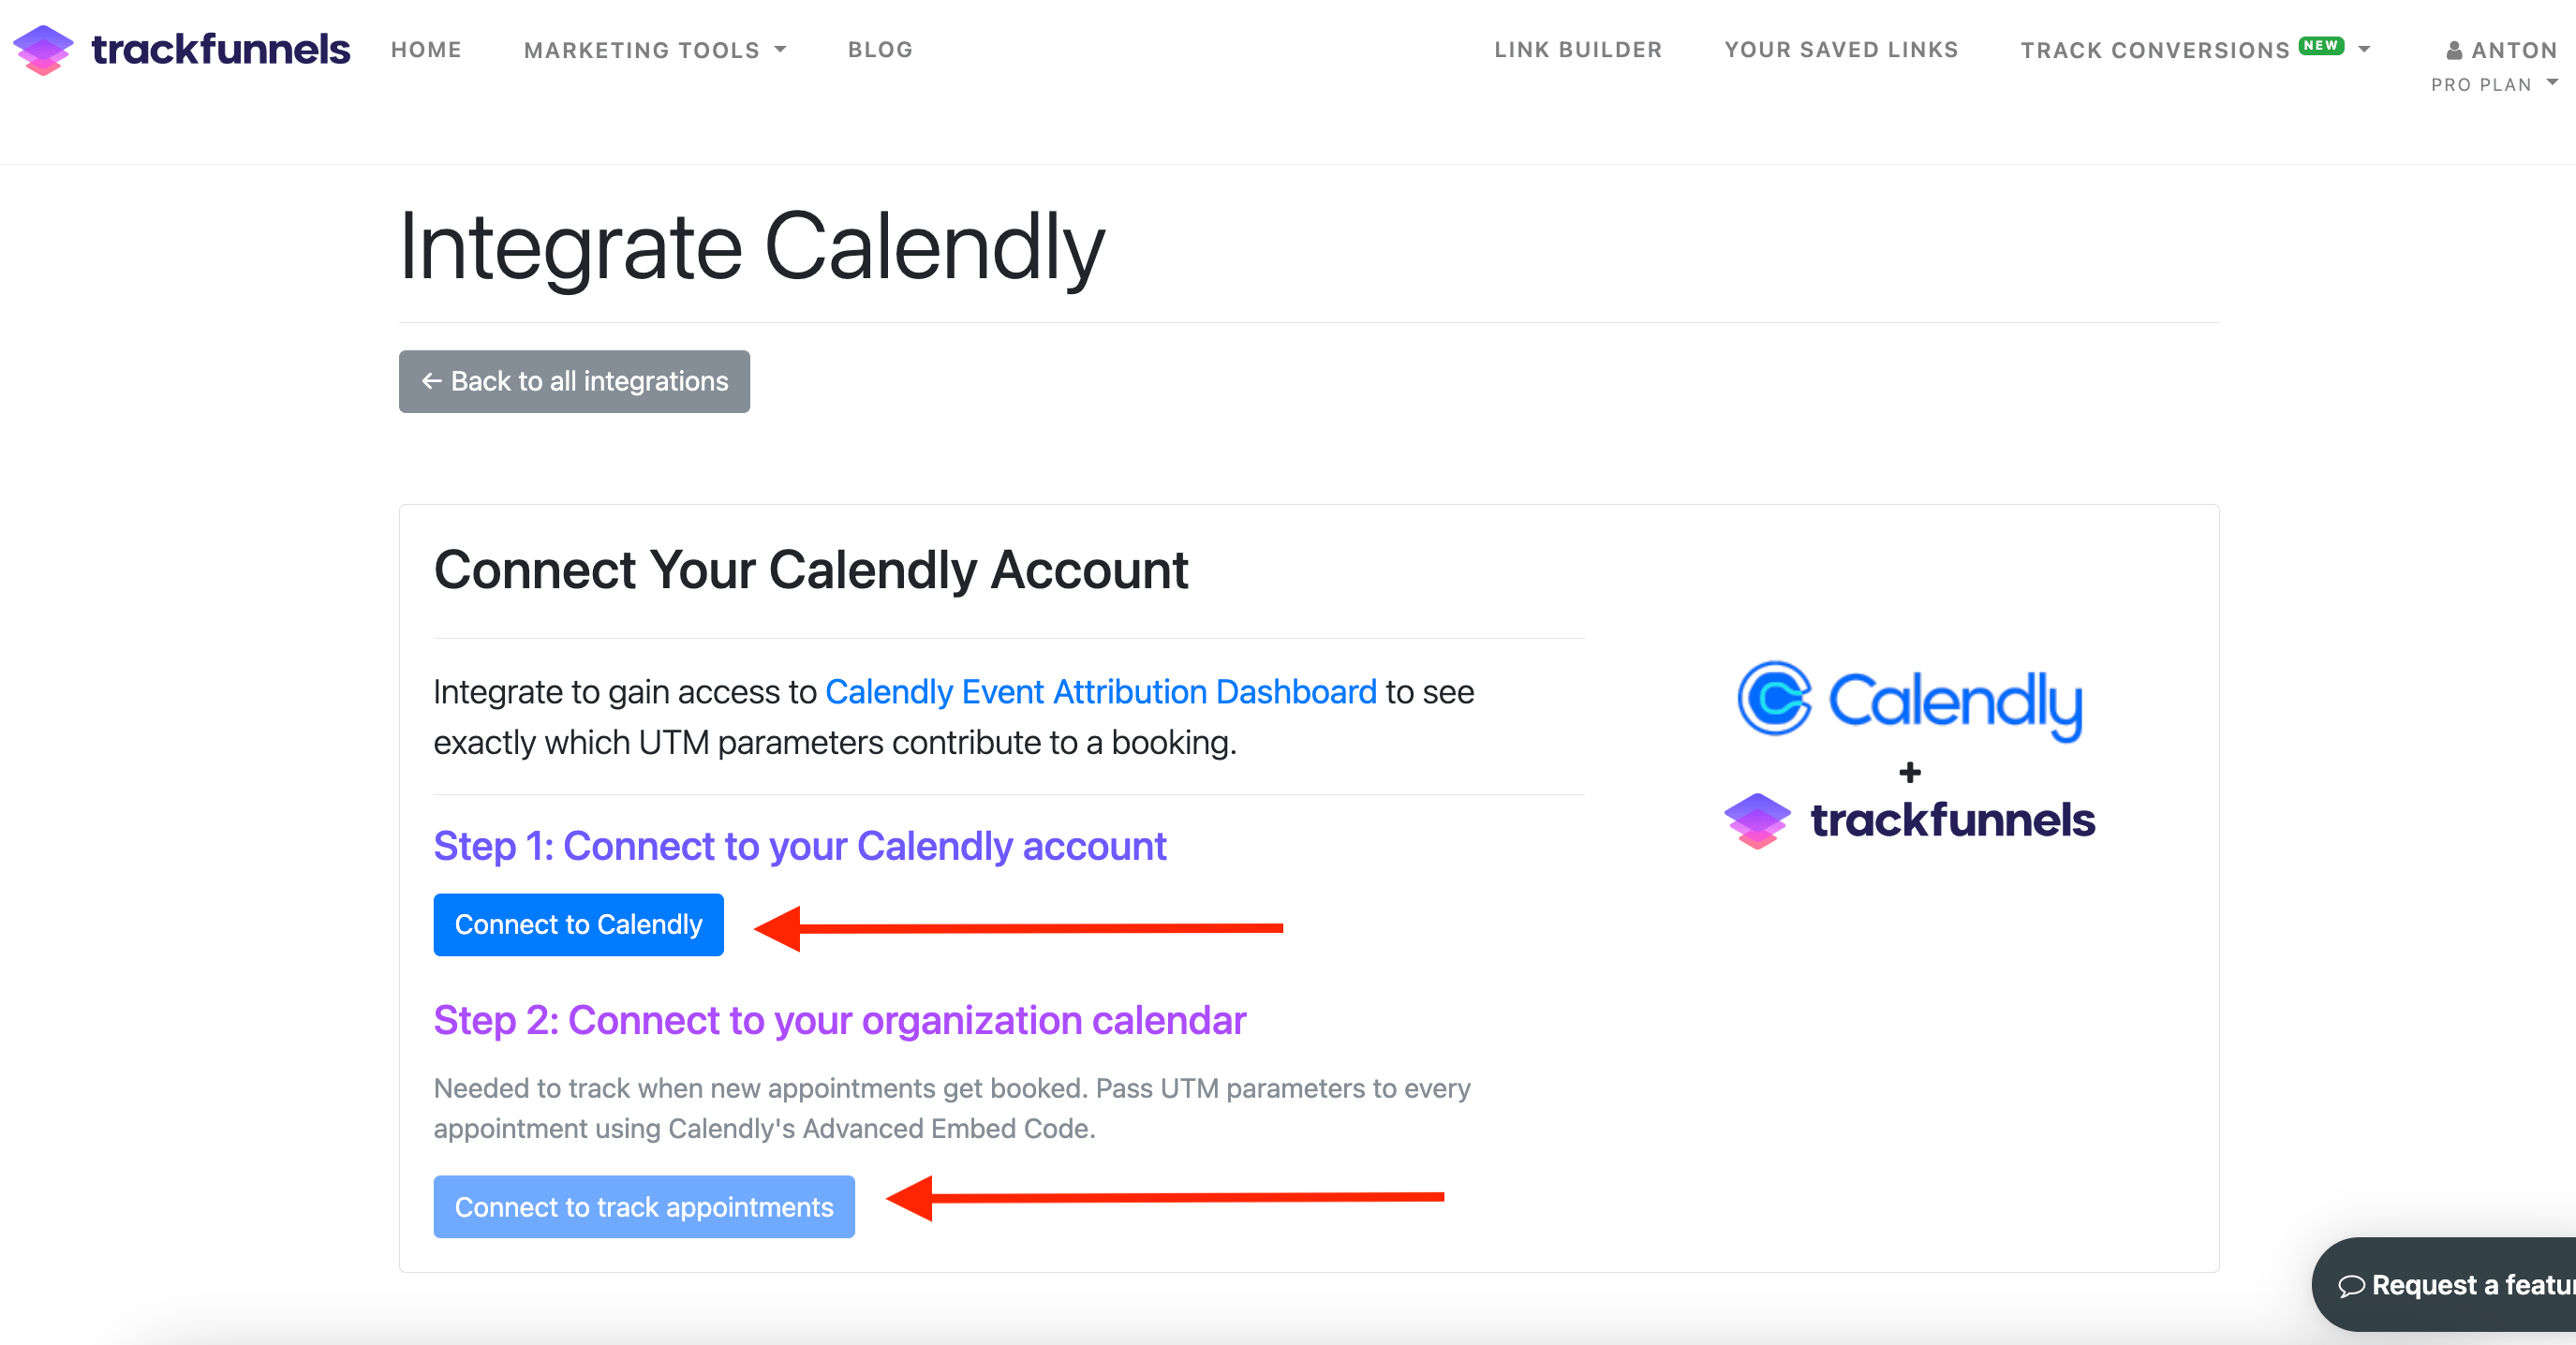 Click the **first button** to authenticate with your Calendly account. This step verifies that you hold a paid Calendly plan. If your Calendly account is on a free plan, the connection will not proceed — you'll need to upgrade your Calendly account first (unfortunately, Calendly offers API integrations to only Paid users).
Once your Calendly account is successfully connected, the second button becomes active.
Click the **second button** to create the webhook API connection between TrackFunnels and your Calendly calendar. This is the step that enables appointment tracking — without it, bookings will not be sent to TrackFunnels.
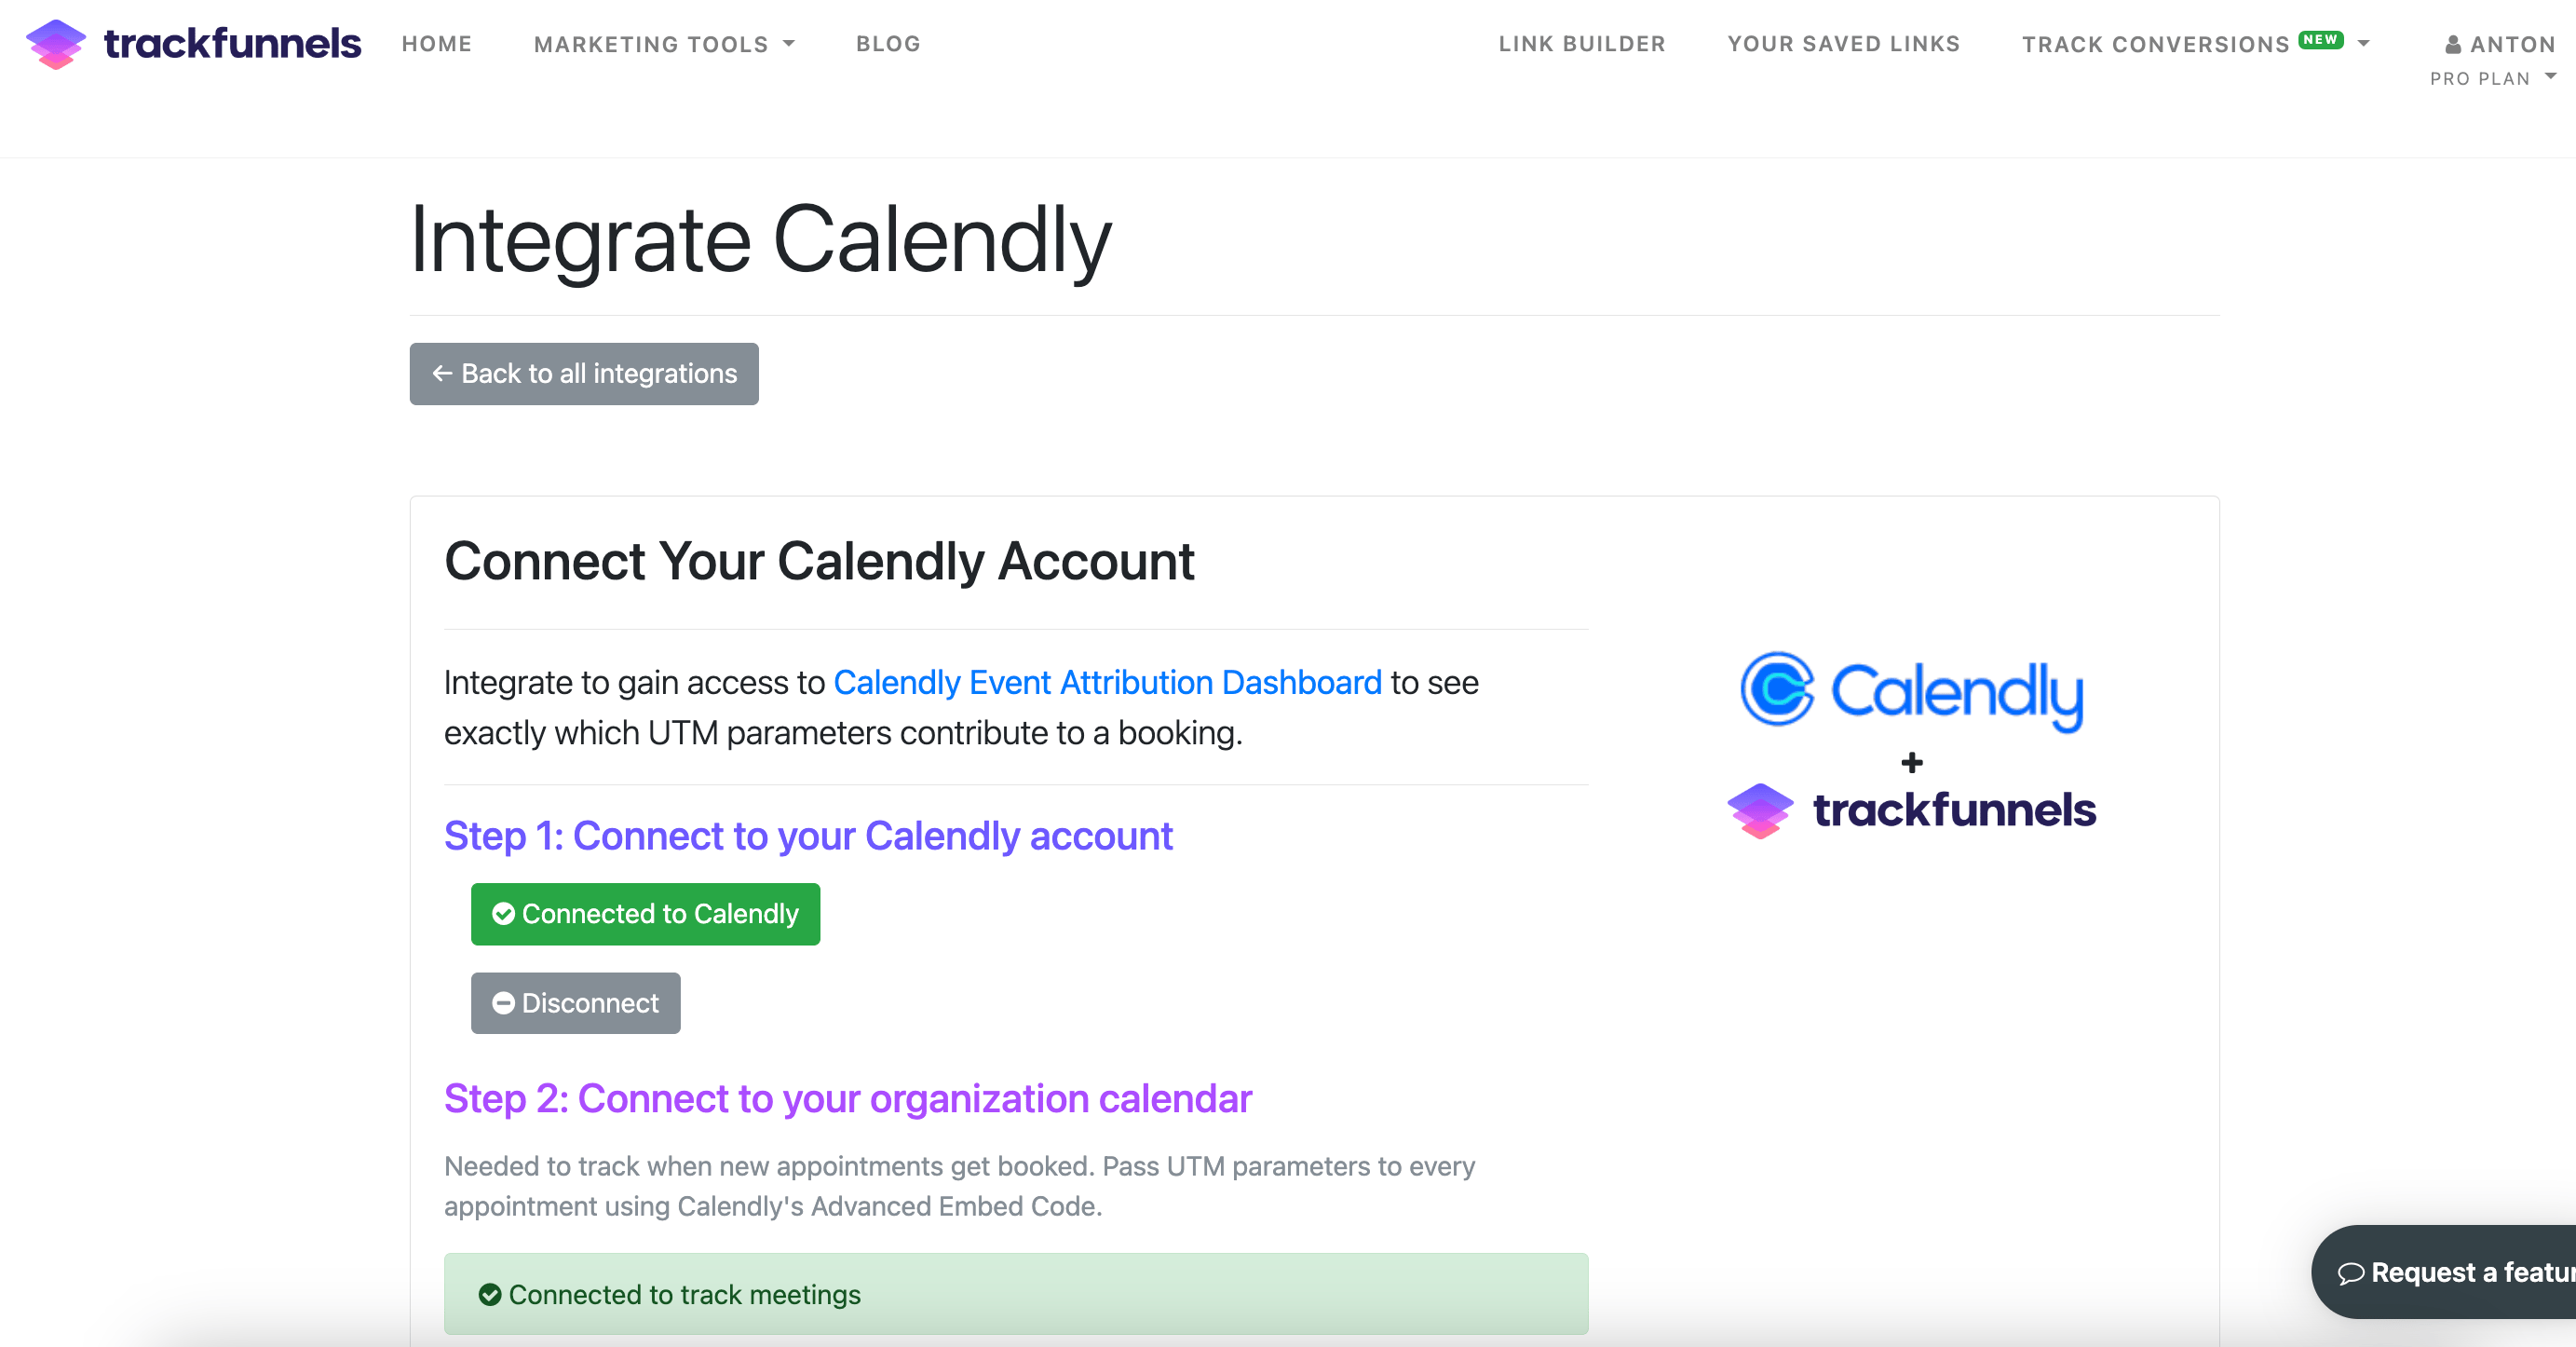
On a successful connection, the status indicators on screen will update to confirm both connections are live.
Click the **first button** to authenticate with your Calendly account. This step verifies that you hold a paid Calendly plan. If your Calendly account is on a free plan, the connection will not proceed — you'll need to upgrade your Calendly account first (unfortunately, Calendly offers API integrations to only Paid users).
Once your Calendly account is successfully connected, the second button becomes active.
Click the **second button** to create the webhook API connection between TrackFunnels and your Calendly calendar. This is the step that enables appointment tracking — without it, bookings will not be sent to TrackFunnels.
On a successful connection, the status indicators on screen will update to confirm both connections are live.
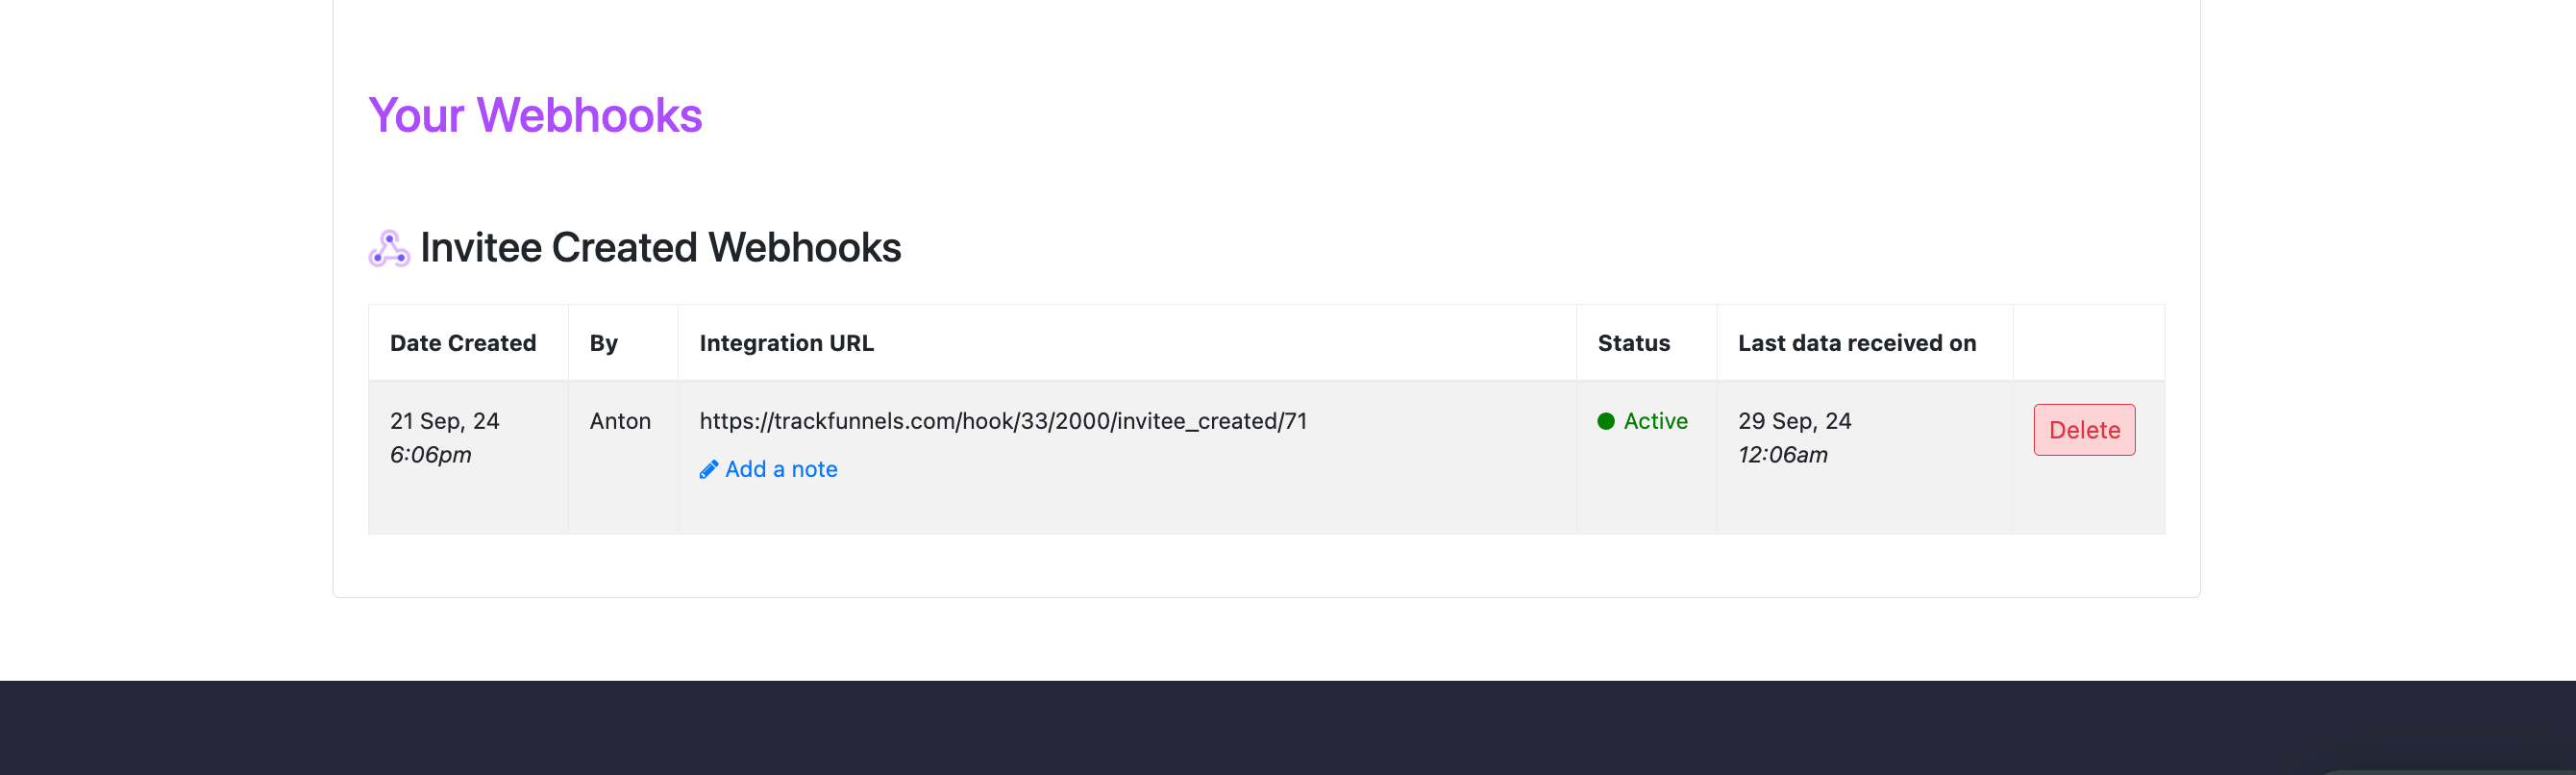
 You'll also see the **"Invitee Created"** webhook table underneath.
Once TrackFunnels begins receiving booking data, an **Active Status** indicator will appear next to your webhook in the table. This confirms that appointments are being tracked and attributed.
You'll also see the **"Invitee Created"** webhook table underneath.
Once TrackFunnels begins receiving booking data, an **Active Status** indicator will appear next to your webhook in the table. This confirms that appointments are being tracked and attributed.
 If you have more than one calendar in your Calendly organization, all calendars are connected through this single webhook. All bookings flow into TrackFunnels, and you can filter your attribution data by **Calendar Name** or **Meeting Name** in the dashboard.
Only **Invitee Created** events are tracked — meaning new bookings only. Changes to existing appointments and cancellations are not currently tracked.
## Passing UTM Parameters to Calendly
For attribution to work, UTM parameters need to reach your Calendly scheduling page. The simplest approach is to append UTM parameters directly to your Calendly scheduling links when you share them — for example, in ads, emails, or social posts.
If you're concerned about visitors landing on your site and potentially losing UTM parameters before they reach Calendly, consider using [Calendly's advanced embed option](https://help.calendly.com/hc/en-us/articles/4409838727703-How-to-embed-and-customize-Calendly-on-your-website#h_01J7GH1V8TDQ6RS0PBGMHMBDEE). This approach embeds the scheduler directly in your page and gives you more control over how UTM parameters are passed through.
If you need help setting up the advanced embed, email the TrackFunnels team at [malik@trackfunnels.com](mailto:malik@trackfunnels.com).
## Spam Bookings
All bookings sent to TrackFunnels via webhook are recorded in your dashboard — including spam or test bookings. TrackFunnels has no way to filter or block these on your behalf. If you're seeing unwanted submissions, configure spam protection and submission controls directly in your Calendly account settings.
## **Selective Submissions**
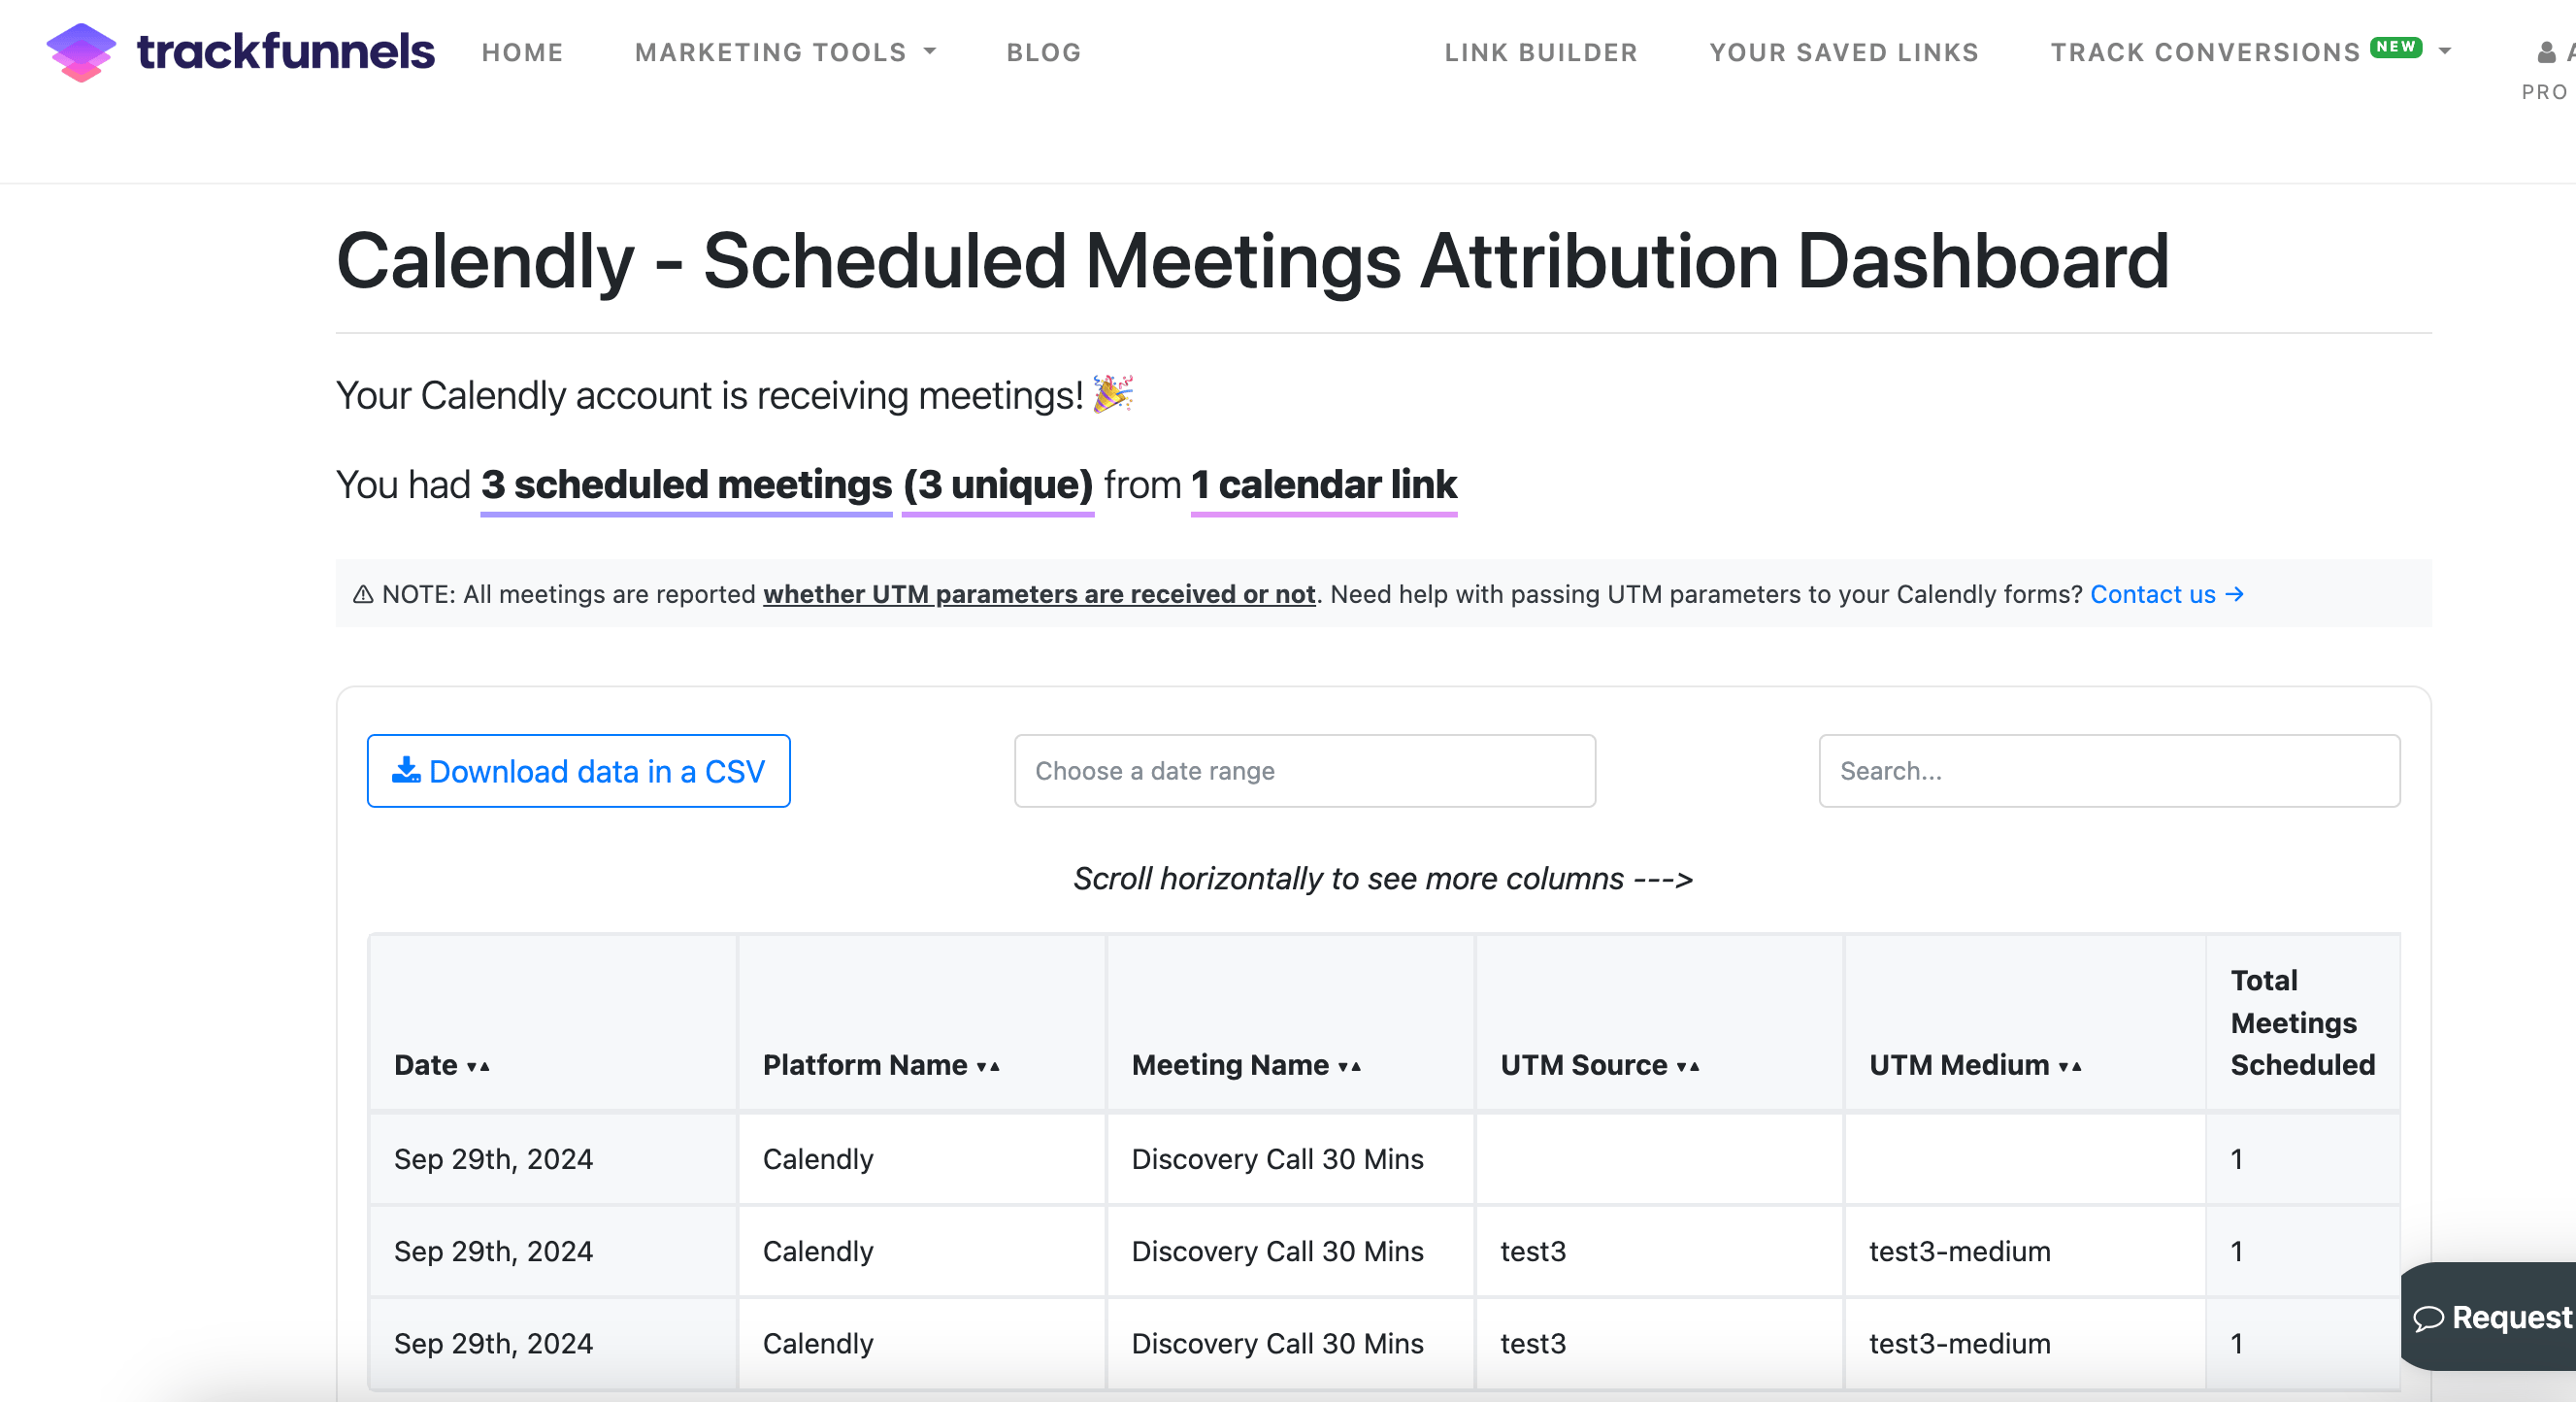
All appointment bookings appear in your **Calendly Attribution Dashboard**, with each row showing the booking details alongside the UTM parameters that were present when the appointment was made.
Use the **search box** at the top of the dashboard to filter by any attribute. If you need additional filtering, sorting, or export options beyond what's available today, click the **Request a Feature** button in the bottom-right corner of your account screen.
You cannot delete individual submissions from the dashboard — manage your booking data at the Calendly level if needed.
If you have more than one calendar in your Calendly organization, all calendars are connected through this single webhook. All bookings flow into TrackFunnels, and you can filter your attribution data by **Calendar Name** or **Meeting Name** in the dashboard.
Only **Invitee Created** events are tracked — meaning new bookings only. Changes to existing appointments and cancellations are not currently tracked.
## Passing UTM Parameters to Calendly
For attribution to work, UTM parameters need to reach your Calendly scheduling page. The simplest approach is to append UTM parameters directly to your Calendly scheduling links when you share them — for example, in ads, emails, or social posts.
If you're concerned about visitors landing on your site and potentially losing UTM parameters before they reach Calendly, consider using [Calendly's advanced embed option](https://help.calendly.com/hc/en-us/articles/4409838727703-How-to-embed-and-customize-Calendly-on-your-website#h_01J7GH1V8TDQ6RS0PBGMHMBDEE). This approach embeds the scheduler directly in your page and gives you more control over how UTM parameters are passed through.
If you need help setting up the advanced embed, email the TrackFunnels team at [malik@trackfunnels.com](mailto:malik@trackfunnels.com).
## Spam Bookings
All bookings sent to TrackFunnels via webhook are recorded in your dashboard — including spam or test bookings. TrackFunnels has no way to filter or block these on your behalf. If you're seeing unwanted submissions, configure spam protection and submission controls directly in your Calendly account settings.
## **Selective Submissions**
All appointment bookings appear in your **Calendly Attribution Dashboard**, with each row showing the booking details alongside the UTM parameters that were present when the appointment was made.
Use the **search box** at the top of the dashboard to filter by any attribute. If you need additional filtering, sorting, or export options beyond what's available today, click the **Request a Feature** button in the bottom-right corner of your account screen.
You cannot delete individual submissions from the dashboard — manage your booking data at the Calendly level if needed.